You can protect your safety and any potential claim by recognizing warning signs of wet floor falls and preserving evidence: visible spills, lack of warning cones or slippery-when-wet signage, faded or damaged flooring, poor lighting, and absence of routine cleaning records. Photograph the scene, note timestamps and witnesses, and document staff responses to strengthen your position.
Key Takeaways:
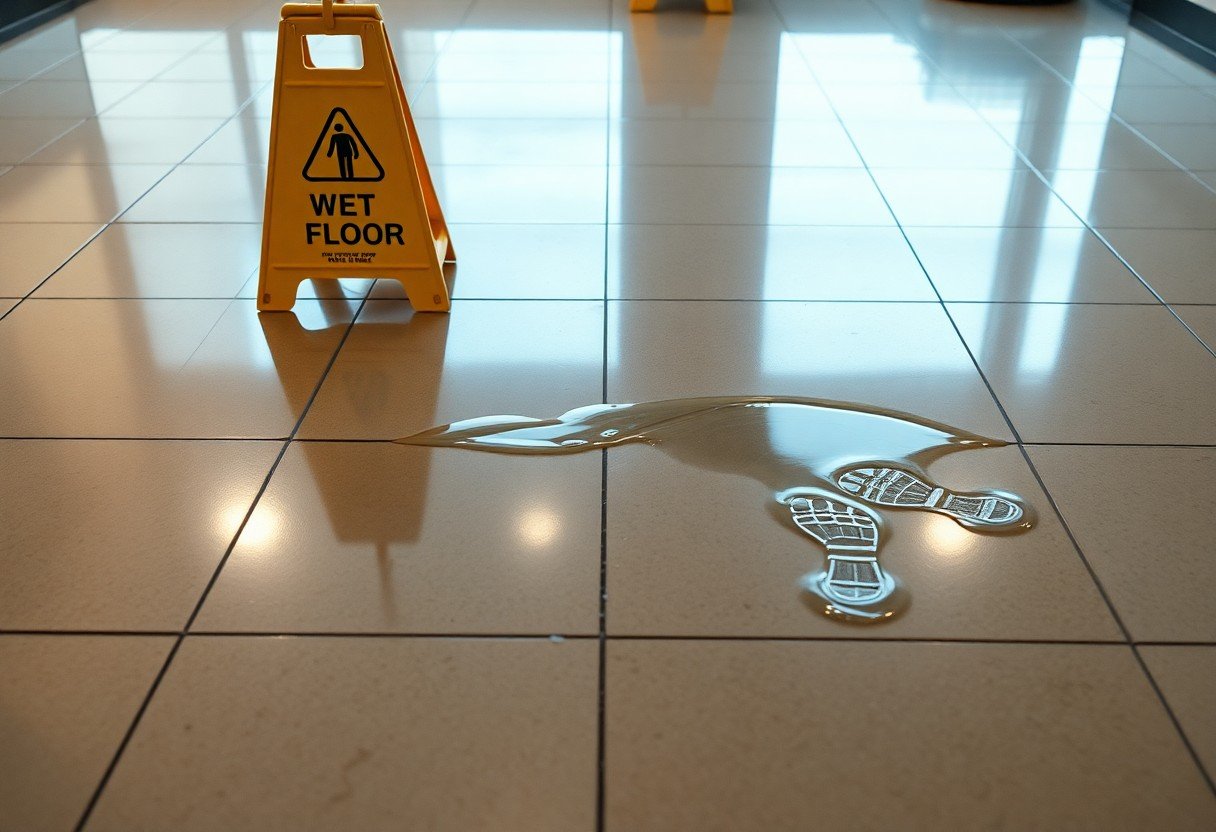
- Presence or absence of wet floor signs and barriers.
- Pooled water, streaks, or mop marks as physical evidence of wetness.
- Floor surface type and contaminants affect slipperiness and fall risk.
- CCTV footage, photos, and witness statements document conditions and timing.
- Maintenance logs, cleaning schedules, and employee reports help establish notice or negligence.
Understanding Wet Floor Falls
When you analyze wet floor falls, liquid films reduce traction quickly; a static coefficient of friction below 0.5 often signals elevated slip risk. Surfaces such as polished tile, sealed concrete, and recently waxed floors turn hazardous within seconds of a spill. In retail and food service incidents, tracked-in rain or unnoticed grease drops are frequent triggers you must detect and address.
Common Causes
Spills from food, beverages, and cooking oil dominate, while mopping during peak hours or leaving buckets and carts in aisles creates transient hazards. Weather-driven moisture-rain, snow, or mud-gets tracked into entryways, and leaking refrigeration or plumbing forms hidden puddles that you might overlook until someone slips.
Risk Factors
Your risk rises when slippery surfaces meet poor footwear, inadequate lighting, or distractions like carrying heavy loads; lab and field tests show worn smooth soles and fast walking markedly increase slip probability. Older occupants face higher injury severity-people over 65 sustain more fractures from falls-so age and mobility profiles matter in site assessments.
- High foot-traffic zones during peak hours
- Infrequent inspections or delayed maintenance
- Inadequate signage or temporary barriers
- This layering of hazards sharply increases both likelihood and severity of falls
Factors compound: a small oil spill on a polished floor during a lunch rush can produce multiple incidents in minutes, with case studies in casual dining showing 60-70% of slips occur during peak shifts. You should evaluate flooring material, cleaning cadence, staffing patterns, and footwear policy together to lower aggregate risk.
- Install anti-slip mats and runner strips at entries
- Schedule cleaning for low-traffic periods and use wet-floor signage
- Enforce slip-resistant footwear in high-risk areas like kitchens
- This coordinated mitigation strategy also strengthens documentation for incident investigations
Legal Responsibilities
You owe a duty of care to visitors under premises liability: maintain safe conditions, inspect reasonably, and correct hazards. Courts evaluate whether your inspection and remediation practices met local standards; businesses in high-traffic areas are often expected to conduct routine checks every 1-2 hours and to document them. If you fail to act or record corrective steps, that lapse can be used as evidence of negligence in lawsuits or insurance claims.
Property Owner Obligations
You must train staff, remove or contain spills promptly, and keep flooring and mats in good repair. Practical steps include logging inspections with time-stamped entries, using absorbent materials or squeegees immediately, and testing floor treatments for slip resistance (COF ≥ 0.5 for many public spaces). Failure to follow these practices increases your legal exposure and worsens claim outcomes.
Warning Sign Requirements
You need clear, visible signs placed so they can be seen from the approach and at both sides of the hazard; ANSI Z535 guidance is often used as a benchmark. Use high-contrast colors and pictograms, consider bilingual wording in diverse communities, and ensure signs are stable (A-frames or mounted) to prevent becoming trip hazards themselves. Courts scrutinize whether signs were conspicuous to a reasonable person.
For stronger compliance, position signs within three feet of the wet area and along natural walking lines, replace faded or damaged signs immediately, and photograph sign placement when documenting incidents. You should also rotate sign types (A-frame plus floor tape) in large areas, and keep a log showing who placed the sign and when-those time-stamped photos and records frequently decide disputes over adequacy of warnings.
Types of Warning Signs
You encounter several sign types that affect liability and visibility: A-frame cones, floor decals, wall-mounted placards, LED electronic signs, and barricade tape, each differing in height, material and symbol clarity; for deeper analysis see What Are the 7 Hidden Dangers of Wet Floor Signs That …. Any failure to use the correct type for the scenario increases slip risk and legal exposure.
- A-frame (portable cones)
- Floor decals and stickers
- Wall-mounted placards
- Electronic/LED message signs
- Barricade tape and stanchions
| A-frame cone | Portable, 18-24″ tall, visible on walk path for temporary spills. |
| Floor decal | Low-profile 6-12″ decals for high-traffic areas; adhesive wear reduces life. |
| Wall-mounted sign | Permanent notice near entrances or stairwells; ideal for recurring hazards. |
| LED/electronic sign | High visibility in low light, programmable messages for dynamic hazards. |
| Barricade tape | Defines larger hazard zones; effective when anchored and combined with signs. |
Visual Indicators
You should judge signs by color contrast (yellow/black or red/white), pictogram size (aim for symbols at least 2 inches/50 mm high), and placement within a 6-10 ft sightline so customers see them before reaching the hazard; reflective or LED elements improve detection under low light and during evening shifts, reducing missed warnings.
Temporary vs. Permanent Signs
You rely on temporary A-frame signs for spills and maintenance-portable and typically 18-24″ tall-while permanent wall or floor-mounted signs serve ongoing hazards and regulatory needs; temporary options are flexible but often moved or stored, whereas permanent signs maintain constant visual cues.
In practice, you should deploy temporary signs immediately at both the hazard and approach points and inspect them every shift; permanent signs work best when mounted where sightlines naturally converge (near entrances, stairways, and service counters) and replaced when fading-temporary units commonly cost $5-$30 and are ideal for short-term response, while durable permanent signs cost $50-$300 depending on material and mounting, so plan budget and maintenance cycles accordingly.
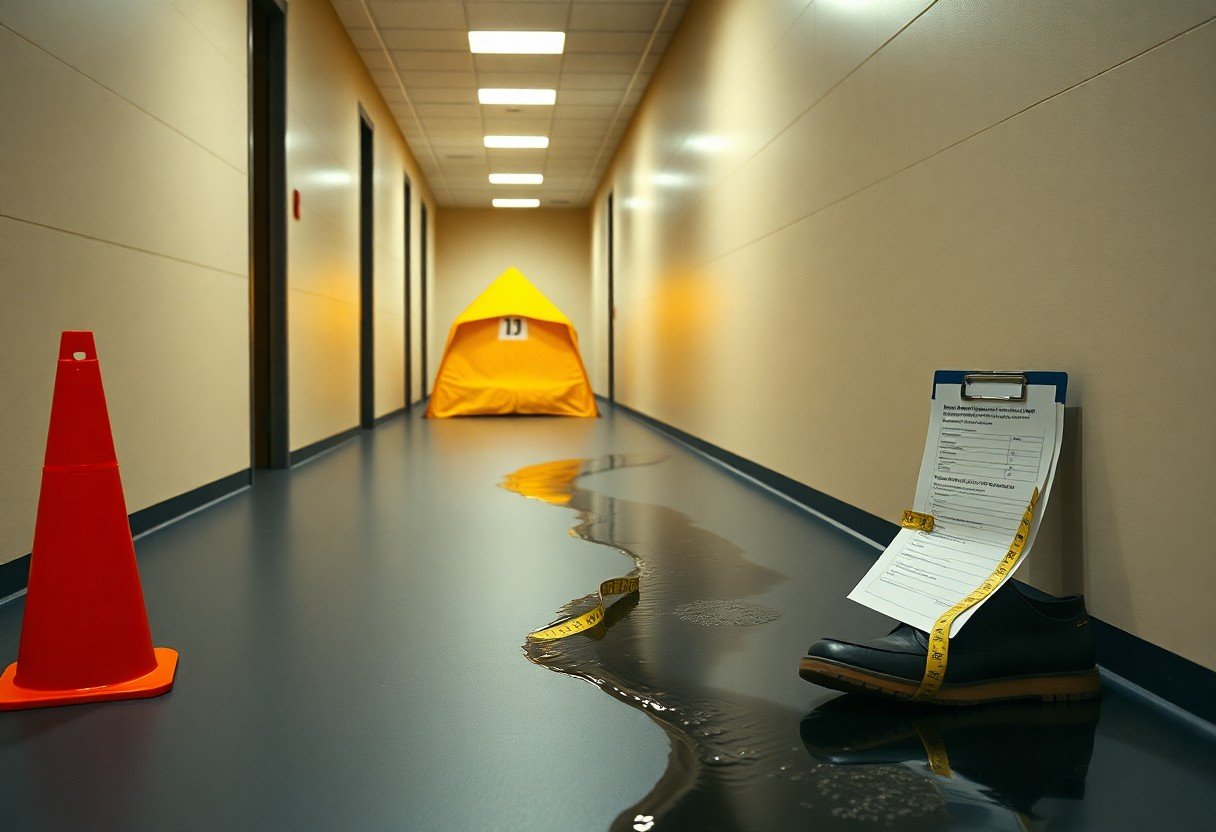
Evidence Collection
You should secure and preserve the area immediately, taking a methodical approach: photograph the scene from multiple distances and angles (aim for at least 12 images), video a 360° walkthrough, mark spill boundaries with cones, and log exact times and witness names. Include floor type, lighting, ambient temperature/humidity, maintenance logs, and any nearby surveillance cameras; if residue is present collect a small swab (2×2 cm) and label it for lab analysis.
Documenting the Scene
When you document, include scale in photos (a measuring tape or ruler), shoot low-angle close-ups of footwear marks and high-angle room shots, and record the distance from the hazard to the nearest sign in feet. Save camera metadata, note whether warning signs were visible or absent and when staff placed them, and export security footage with timestamps to avoid later alteration.
Witness Accounts
You should obtain contact details and immediate statements from everyone who saw the fall, asking specific questions: where they stood, how far (in feet) they were, what they saw happen, and how many seconds elapsed between spill and fall. Request a quick sketch of line-of-sight, note any assistive devices the witness used, and, when possible, record audio or video of their statement with consent.
Follow up by comparing statements against objective evidence: reconcile distances and timing with photo timestamps and video footage, flag contradictions (e.g., one witness says 3 seconds, another 30), and document any factors affecting perception such as crowding or poor lighting. Use a simple intake form-name, phone, vantage point in feet, exact wording of description, and whether they intervened-to standardize statements for investigators and counsel.
Preventative Measures
Use a layered approach: install anti-slip mats at entrances, apply textured floor treatments where traffic is heaviest, and ensure drains and floor slopes remove water promptly. Follow OSHA 29 CFR 1910.22 for keeping surfaces clean and dry, and aim for a wet static coefficient of friction (SCOF) of about 0.5 or higher using ANSI/NFSI B101.1 testing. Maintain visible signage, log all cleaning and inspections, and audit high-risk zones weekly to catch deterioration before it leads to falls.
Maintenance Practices
Schedule daily walk-throughs with a checklist that logs spills, floor finish condition, and mat placement; respond to spills within minutes using squeegees and absorbents, post barriers until dry, and record time and employee name. Use microfiber mops and pH-neutral cleaners to avoid residue buildup, and plan strip-and-recoat cycles every 6-12 months in high-traffic areas. Verify slip resistance after any treatment and after seasonal changes with COF testing.
Training for Staff
Deliver an initial 30-60 minute hands-on session covering immediate spill response, proper signage placement, footwear standards, and documentation; follow with 15-30 minute quarterly refreshers and brief monthly drills. Give employees competency checks-demonstrating correct mopping and barrier setup-and require logging of near-misses so you spot trends early. Use short video demos and on-the-job shadowing to reinforce correct techniques.
Track training effectiveness with measurable metrics: slips per 100,000 work hours, near-miss counts, and audit compliance percentages. Run monthly scenario drills (e.g., oil spill in aisle) and time your response-to-dry intervals, then review logs in safety meetings. Tie performance to corrective actions-coaching, retraining, or equipment changes-and maintain training records for at least three years to support continuous improvement and any potential incident investigations.
Legal Recourse
You can pursue an insurance claim, negotiate a settlement, or file a personal injury suit depending on severity and damages; many small-claims courts cap recovery between $2,500 and $25,000, while formal lawsuits handle larger losses. Statutes of limitations typically range from 1-6 years (commonly 1-3 years), so act promptly. Preserve medical records, photos, and witness contact details to strengthen any claim you bring against a property owner or business.
Filing a Claim
Begin by reporting the incident to on-site management and obtaining an incident report, then preserve evidence like photographs, CCTV timestamps, and your shoes. Seek medical care and keep all bills; insurance companies often request records within weeks. If negotiation stalls, a complaint can be filed in civil court-small-claims for lower damages or district court for higher losses-with deadlines and filing fees that vary by jurisdiction.
Proving Negligence
You need to establish duty, breach, causation, and damages: show the owner owed you a safe space, failed to act (e.g., no warning sign, missed checks), that this failure caused your fall, and that you suffered quantifiable injury. Hard evidence like maintenance logs, prior incident reports, CCTV, witness statements, and medical documentation often determines liability. Be aware many states apply comparative negligence rules with 50% or 51% bars that can reduce or bar recovery.
For example, a grocery fall supported by CCTV showing a spill present for 12 minutes, a maintenance log with no checks that hour, two witness affidavits, and medical imaging proving a fracture creates a strong chain of causation; you can then use a biomechanical or medical expert to quantify permanent impairment, which often shifts settlement leverage and increases valuation into the tens of thousands depending on lost wages and care needs.
Summing up
Now you should assess wet floor fall risks by noting visible hazards like pooled water, wet sheen, dripping ceilings, missing warning signs, recent mopping, or poor drainage; collect evidence such as photos with timestamps, CCTV, witness statements, incident reports, and maintenance logs to document the hazard and protect your safety and legal position.
FAQ
Q: What visible warning signs indicate a wet-floor hazard?
A: Shiny or reflective surface sheen, visible puddles or streaks, dripping or pooling near entrances, wet footprints or streak marks, recently moved mop buckets or wet-cleaning equipment, condensation on floors near HVAC or refrigeration units, and absence or displacement of warning cones or wet-floor signs.
Q: What physical evidence should be collected after a wet-floor fall?
A: Time-stamped photographs and video from multiple angles (close-ups and wide shots), measurements of spill area and distance to hazards, clothing and footwear with water or skid marks preserved in paper or breathable bags, CCTV footage, floor surface samples if contamination is suspected, medical records and injury photos, and any cleaning supplies or equipment left at the scene.
Q: How should the scene be documented to preserve evidence for an investigation?
A: Secure the area to prevent alteration, photograph and video the scene from several perspectives with scale references, record exact time and environmental conditions, measure distances between hazard and landmarks, collect witness names and written statements, obtain CCTV or access logs promptly, and log who entered or cleaned the area after the incident.
Q: What records and logs help establish whether property owners or staff had notice of the hazard?
A: Cleaning and maintenance logs showing time and scope of recent floor work, incident and shift reports, staff schedules and training records, equipment service and inspection records, inventory of warning signs and cones, security or access-control logs, and any prior complaints or reports about the same area.
Q: What immediate steps should the injured person and witnesses take to protect health and later evidence?
A: Seek medical attention and obtain a medical report, notify on-site management or security, avoid cleaning or moving items in the incident area, take time-stamped photos and video, collect witness contact information and written statements, preserve clothing and footwear, request CCTV preservation, and document conversations with staff about the incident.